Ads 468x60px

Selasa, 22 Mei 2012

Membuat Toko Online Dengan Prestashop


Bagaimana kabar bisnis anda hari ini? Semoga semakin lancar ya. Kali ini saya akan memberikan tutorial tentang bagaimana membuat toko online dengan PrestaShop.  PrestaShop adalah salah satu solusi toko online yang sangat diminati saat ini. Menurut statistik, ada lebih dari 100.000 toko di internet yang dibuat dengan PrestaShop ini. Angka tersebut sangat fantastis mengingat PrestaShop baru dilaunching pada tahun 2007.
PrestaShop adalah komponen e-commerce yang bisa digunakan oleh siapa saja dan bersifat open source (gratis). Hampir sama seperti Joomla dan VirtueMart, hanya beda teknologinya. Bagi anda yang ingin belajar membuat toko online dengan Joomla dan VirtueMart bisa membaca tulisan saya disini. Basis pengguna yang besar membuat saya tertarik mengeksplorasi PrestaShop ini dan membaginya dengan anda. Oh ya, pada tahun 2011 lalu PrestaShop memenangkan Open Source Award sebagai The Best Open Source Business Application. Nah, jadi tidak ada ruginya kan belajar PrestaShop ini? Siapa tahu bisnis online anda semakin meningkat. Atau, bagi anda yang belum memiliki bisnis online, siapa tahu menjadi tergerak untuk mulai berbisnis online :) . Mari kita mulai.
Persiapan
Sebelum melangkah, berikut ini pemanasan yang harus dilakukan
  1. Pastikan anda memiliki webserver dan database server pada komputer/laptop anda. Saya merekomendasikan anda menggunakanXAMPP, sebab anda akan mendapat keduanya dengan sekali install. Tutorial ini akan menuntun anda membuat toko online di laptop/komputer, bukan di website. Instalasi di website akan saya tunjukkan diposting yang lain.
  2. Download aplikasi PrestaShop versi 1.4.6 disini.
  3. Download versi prestashop 1.4.82
  4. Download khusus indonesia prestashop_1250_mod-id_02.html
Langkah-langkah
1. Ekstrak file aplikasi PrestaShop yang telah didownload, akan muncul folder prestashop.
2. Copykan folder prestashop dan semua isinya ke folder public dari web server anda. Jika menggunakan XAMPP, copykan ke c:\xampp\htdocs.
3. Rename folder prestashop yang sudah dicopy tersebut dengan nama yang mencerminkan nama toko anda (misalnya: tokosaya).
4. Buka web browser anda, lalu akses halaman instalasi dengan mengetikkan http://localhost/tokosaya. sehingga muncul halaman seperti gambar berikut. 
5. Kemudian klik Next/Continue. Selanjutnya akan muncul halaman seperti gambar dibawah ini. Halaman ini mengecek secara otomatis, apakah webserver, PHP dan MySQL database sudah sesuai dengan kebutuhan yang diperlukan oleh PrestaShop.
6.Jika semuanya OK dan ada tulisan “Your configuration is Valid”, maka langsung saja klik Next, sehingga muncul halaman ke-3 dibawah ini.
7. Disini anda harus mengisikan data-data konfigurasi database. Saya mengasumsikan anda sudah bisa membuat database sendiri di MySQL. Jika anda belum bisa membuat database di MySQL, silakan baca tulisan saya disini (http://gundaria.blogspot.com/2012/05/membuat-database-mysql-dengan-xampp.html). Isikan user dan password MySQL anda dan nama database untuk aplikasi ini. Ingat, database sudah harus dibuat terlebih dahulu meskipun belum ada isinya. Dalam contoh diatas, saya telah membuat database kosong dengan nama db_prestashop. Sehingga yang harus diisi adalah.
Database Server Name     : localhost
Database Name        : db_prestashop (anda harus buat dulu di MySQL database dengan nama db_prestashop)
Database login        : root
Database password        : [kosong] (atau sesuaikan dgn password anda)Isian yang lain biarkan saja sesuai defaultnya.
Kemudian klik “Verify my database settings”. Jika muncul tulisan “Database is connected”, berarti database anda sudah terkoneksi. Jika ada error, berarti isian informasi anda mengenai database ada yang salah. Kemudian klik Next, akan muncul gambar seperti dibawah ini.
8. Pada halaman ini, isikan nama toko, kategori, negara dan timezone dan isian2 yang lain termasuk email dan password. Jika anda sudah memiliki logo, maka masukkan file gambar logo anda. Jika belum, tidak mengapa, anda bisa memasukkannya nanti. Jika sudah, klik Next.
9. Halaman ini menandakan bahwa proses instalasi telah selesai. Sebelum melanjutkan ke langkah berikutnya, hapus dulu folder “install” pada direktori c:/xampp/htdocs/tokosaya/install. Pada halaman ini, terdapat pilihan “Back Office” atau “Front Office”. Pilihan Back Office bertujuan untuk masuk ke halaman administrator, yang berguna untuk pengaturan toko online anda lebih lanjut. Sedangkan pilihan Front Office akan membawa anda ke website toko online anda.
10. Jika anda klik Back Office, maka akan muncul halaman berikut.
11. Selanjutnya isikan email dan password anda, lalu klik Login. Sehingga akan tampil halaman administrasi sebagai berikut.
12. Jika langsung menuju Front Office, maka akan muncul website toko online anda, yang menandakan instalasi anda telah berhasil.
Selanjutnya, jika anda ingin membuka langsung toko online anda dari web browser, masukkan alamat http://localhost/tokosaya (dalam hal ini nama folder prestashop sudah saya rename menjadi tokosaya). Jika ingin melakukan administrasi toko anda, masukkan alamat htpp://localhost/tokosaya/admin, maka akan muncul halaman administrasi seperti diatas.
Halaman administrasi PrestaShop sangat lengkap dan lebih dari cukup untuk mengelola sebuah toko online kecil, menengah bahkan sampai besar. Di bagian dashboard terdapat tampilan summary yang cukup bagus untuk memudahkan pemilik mengetahui total penjualan yang sudah berhasil dilakukan. Selain itu masih banyak lagi menu untuk mengelola toko anda yang bisa anda jajaki satu persatu. Dalam posting selanjutnya saya akan mengeksplorasi fitur-fitur administrasi dalam PrestaShop untuk menunjang operasional toko online yang efektif, sabar ya…

Membuat Database MySQL dengan XAMPP


Proses  pembuatan database mySQL di Localhost dengan menggunakan XAMPP server dan membuat database di WebHosting account milik kamu pada dasarnya adalah sama. yang berbeda cuma status online-nya, kalau di Xampp offline sementara di web hosting online.
 Bagi kamu yang sudah punya aplikasi Xampp tapi masih bingung cara buat database MySQL-nya, berikut ini tutorial langkah demi langkah cara membuat database mySQL di PHPMyAdmin :
  • Buka web browser  kamu. pada address bar Ketikkan URL  ” http://Localhost/XAMPP “
  • Selanjutnya Klik  English
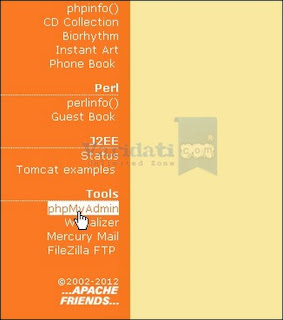
  • Pilih menu  phpMyAdmin  seperti  pada gambar di bawah ini
  • Klik pada tab menu Basisdata / Database
  •  Ketikkan nama database yang ingin dibuat pada kotak Create New Database  / Ciptakan Database Baru  kemudian  klik tombol   Create  untuk membuat database tersebut.
  • Apabila Database berhasil Anda buat maka akan muncul pesan “ Database  has been created.”

Selesai…sekarang tinggal anda instal WordPress CMS atau CMS-CMS  lainnya ke localhost Xampp server anda. sekian…

Senin, 07 Mei 2012

Materi Lab C++ Gunadarma

Program C++ Dasi Kupu-Kupu

 OUTPUT:
Program C++ Piramida

OUTPUT:
Program C++ Matriks Penjumlahan, Pengurangan , Pembagian, Perkalian

OUTPUT:
 Program C++ Volume Kerucut dan Volume Balok
OUTPUT

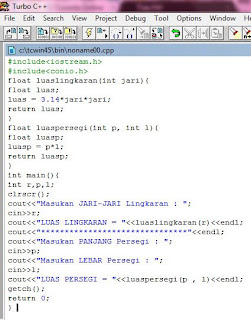
Program C++ Luas Lingkaran dan Luas Persegi

OUTPUT
Program C++ Concat, length, upper, lower
OUTPUT MENU
OUTPUT LOWER
 OUTPUT UPPER
 OUTPUT REV
 OUTPUT LENGTH
OUTPUT CONCET

 Program C++ Notpad
 OUTPUT
Program C++ switch-case BIODATA, IF (BILANGAN CACAHm GANJIL) , FOR (LOOPING)

#include <iostream.h>
#include <conio.h>
int bil,b,c,d,i,j,k,l;
char pil,nama[20],npm[10],kls[10];
void main ()
{
do
{
clrscr();
menu:
clrscr();
cout << " =====* MENU *=====\n";
cout << " 1. Biodata \n";
cout << " 2. Kondisi \n";
cout << " 3. Looping \n";
cout << " 4. Keluar \n";
cout << "==================================\n";
cout << " Masukan Pilihan Anda [1..4] : "; cin >> pil;
switch (pil)
{
case '1':
clrscr();
cout <<"Masukkan Nama anda : "; cin>>nama;
cout <<"Masukkan Kelas Anda : "; cin>>kls;
cout <<"Masukkan Npm Anda : "; cin>>npm;
cout <<"Nama anda adalah : "<< nama<<" , ";
cout <<"Kelas anda adalah : "<< kls<<" , ";
cout <<"Npm anda adalah : "<< npm;
break;

case '2':
clrscr();
cout<<"Masukan Angka : ";cin>>b;
if (b==0)
{
cout<<"0 bukan bilangan ganjil dan genap ";
}
else
{
if (b%2==0)
{
cout<<b<<" adalah bilangan genap";
}
else
{
cout<<b<<" adalah bilangan ganjil";
}
}
break;

case '3':
clrscr ();
cout << "Masukkan Banyak Deret: ";cin >> bil;
for(i=1;i<=bil;i++)
{
for(j=1;j<=i;j++)
{
cout << j;
}
cout << endl;
}
for(i=bil-1;i>=1;i--)
{
for(j=1;j<=i;j++)
{
cout << j;
}
cout << endl;
}
break;

case '4':
clrscr();
cout << "Terimakasih Telah Menggunakan Program ";
break;
default:
cout << "Pilihan Tidak Tersedia ";
}
getch ();
}
while (pil !='4');
}


Sabtu, 05 Mei 2012

V6 Super Charger galaxy y

One of the Worst thing in the Android is When you install Many Apps... It will lag like hell... When you utilize your full processor speed... It couldn't help... I myself *experience* it... Then i searched here and there about Tweaking RAM performance... I finally found out a Method to Tweak your Galaxy Y's RAM Performance... It really works Great with my Galaxy Y... There are two scripts to make your RAM Perform well... These Scripts are called V6 Super Charger and Kickass Kernalizer... Okay Here we go...

Note: This Tweak can only perform in Rooted Galaxy Y... Do you want to Know How to Root your Galaxy Y...Click here for the Tutorial

V6 Super Charger

What is V6 Super Charger and What it Does Actually?

  • Android memory consumption concept is all about efficiency. The device’s RAM is a resource that is meant to be used; 100% of it (if possible), all the time (if possible).
  • Android utilizes unused RAM to cache data and filesystem meta-data from slower storage devices (Flash or disk) because fetching the information from the RAM is much quicker.
  • So the Super Charger does is,*It rearranges and fixes the OOM Groupings and Priorites and lowmemorykiller values.


Benefits of V6 Supper Charger


  • It's a Complete Memory Management Fix to make your Phone Fast and Supper Snappy with better Multitasking!!!
  • No Launcher Redraws, faster than ever, multitasking is better... why?*Because it works with the lowmemorykiller and letting it work the way it's meant to work.
  • Also, because of the rearrangement, it works the same on all roms!


Requirements

Note: Don't bother about the Extension of the Script... Yes, I know its in PDF format... Just leave as it is...

Steps to Install

1) Make Backup of your*Existing*ROM using CWM - Download

2) First we are going to Install BusyBox V1.18.2... Open Busybox Installer and follow the below steps...

* * 2.1) This is the First screen when you open Busybox Installer... Now Tap the Down arrow key to select Busybox V1.18.2...

*

* * 2.2) Once you installed Busybox V1.18.2, you will see this*confirmation*message...


3) Now we are going to Run V6 Super Charger Script... Follow the below steps carefully and*accurately...

* * 3.1) Now open Script Manager Ads... Since this is the first time we are launching Script Manager... Allow 'Browse As Root' option...


* *3.2) Now Scroll down and select 'V6_SuperCharger_for_Android-Update9_RC6.9.sh' pdf file...*


* * 3.3)*A popup window will appear. On this window, select the "Fav" and "SU" buttons near the top (adding to favorites makes it easier to access later), then click "Run" in the top left...


* 3.4)*Now Text will start scrolling, you can scroll up at any time if you missed something. Script will do a bunch of tests to make sure you've got busybox and all that, your phone should pass fine. When asked to choose a scroll speed, choose 'Fast' by entering '1'...


* *3.5) Now in the next step select 'local.prop'...


* * 3.6) In the Next Step Select 'No'


* * 3.7)*You should now see the 'Driver's Console' a list of options numbered 1-30 and below that, various information on what's going on with your phone about SuperCharger....* * * * ** At the Driver's Console, you will need to pick one of the options listed under 512 HP (5, 6, or 7). Choosing 5 means more apps can run in the background, but the performance benefits will not be great... Choosing 7 will have the greatest performance benefits, but you may end up with a lot of apps being closed behind your back... If you're not sure which one you should pick, Choose 6. This is the best option for most people...


* *3.8) Whichever the option you choose, It will ask you to 'SuperClean & Restart'... And you must do... It will Wipe your Dalvik Cache...


* *3.9)*After restart, open Script Manager and launch the V6 script again (if you added it to your favorites, once in Script Manager, click Menu Button > Favorites). Now in Driver Console Select option '13' which is 'OOM Grouping Fixes + BulletProof Launcher'... And give 'Yes' to install BulletProof launcher...


* * 3.10) Now back in Driver Console optoins, Select '20' Which is 'Nitrolag Nullifier'... Then Give 'Yes' to Drop all the caches...


* *3.11) Then again back in Driver Console, Select '18' which is 'Engine Flush'...


* * 3.12) Then back to Driver Console, Select '29' which is 'Super Clean & Restart'...


4) When you *finished* all the above steps...**You should notice a considerably faster startup time and a much snappier launcher. Lets verify everything was installed correctly by launching the script one more time...

5)*When you get to Driver's Console, look at the area below the options, you should see the following messages (you'll see others too, but these are the important ones)

  • Launcher is BULLETPROOF! i.e. SUPERCHARGED!
  • OOM Grouping Fixes ARE in effect!
  • Current values MATCH Prior SuperCharge!
  • Nitro Lag Nullifier is Installed!

6) If you see Everything there... Thats it, You successfully installed the V6 Script... Enjoy the Performance of your Device...


Kickass Kernalizer

What is it?

  • Everyone said this will Tweak your Galaxy Y to Perform more faster and it tweaks I/O Scheduler..
  • But for me, After installing this script my SDCard Scanning is Blazing speed... It really Increases my I/O device performance...

Steps to Install

1) Now just like the above steps... Open 'Script Manager' and select the 'KickAssKernelizer_Tweaks_Installer_Update_3_RC6.sh' pdf file...
*A popup window will appear. On this window, select the "Fav" "SU" and "Boot" buttons near the top, then click "Run" in the top left...


2)*Now Text will start scrolling, you can scroll up at any time if you missed something... When the script prompt for an input Choose 'Kick Ass' from the list...


3) Now the script will ask you, Whether you want to Enable I/O scheduler... Give 'Yes' to enable it...


4) Thats it... Reboot your Device manually and see the Performance... I Bet you will feel the Increased Performance...